
LS 40: Lightroom Camera Profiles In-Depth
Live Session
Summary
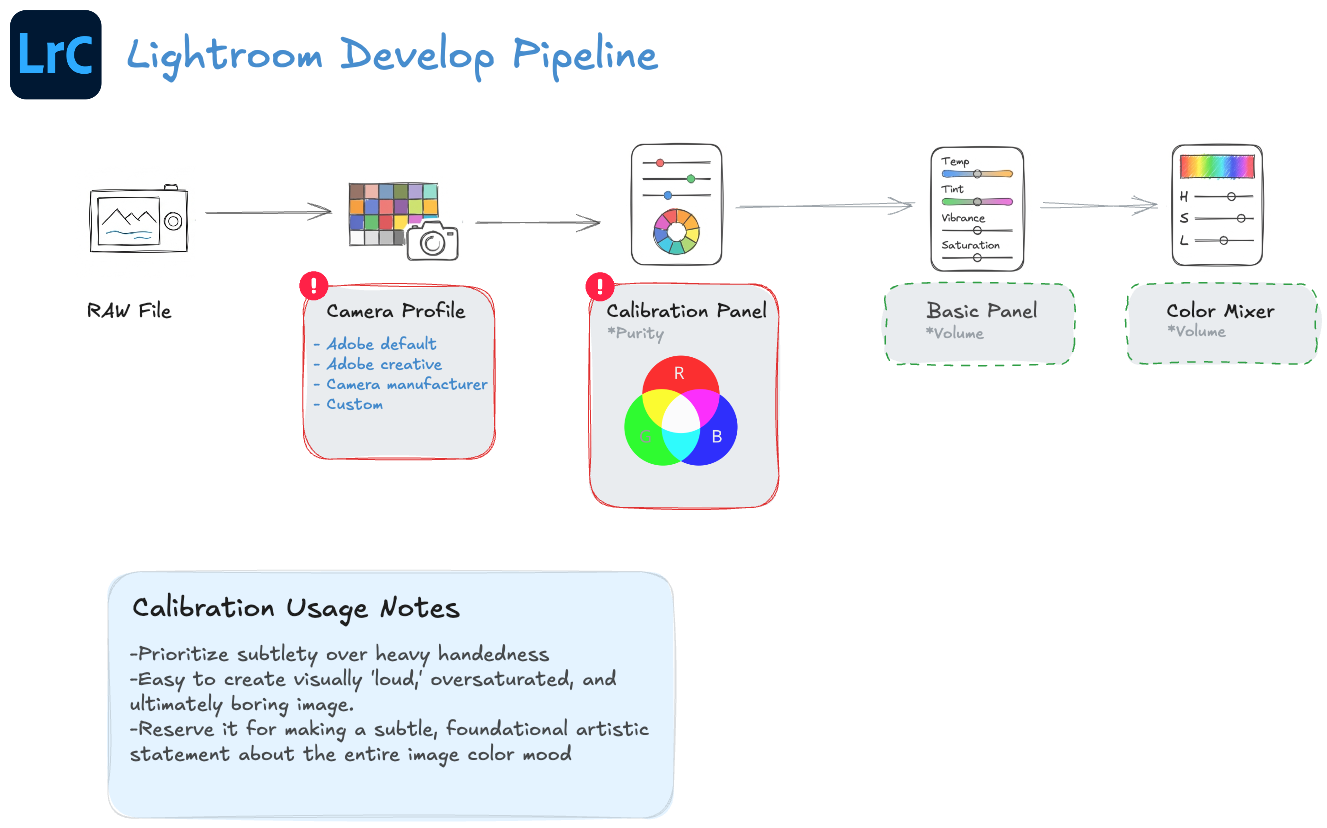
In this session, we explore one of Lightroom’s most powerful yet often overlooked tools: camera profiles and the calibration panel. I’ll walk you through how profiles work as the very first step in RAW processing, and why understanding this matters for your creative vision.
If you’ve ever struggled to add warmth without muddying your colors or wanted that beautiful glow in backlit scenes, this session will open up entirely new possibilities in your editing workflow.
Key Takeaways
- Camera profiles are the true starting point of RAW processing – they determine how Lightroom interprets your sensor data before any slider touches your image. Think of them as the foundation your entire edit is built upon.
- The Calibration panel is surprisingly powerful because it affects every pixel in your image at once by shifting how Lightroom interprets the primary colors. Small moves create global changes – it’s not a selective tool, it’s a fundamental one.
- Saturating the blue primary creates warmer, more luminous colors throughout your image – this is color wheel theory in action. When blues become richer, the complementary warm tones appear purer and more vibrant by contrast.
- Profiles, presets, and auto are three different tools solving different problems. Profiles change how RAW data is rendered (foundational); presets adjust sliders (adjustable); auto analyzes and applies corrections (automated). Knowing which to reach for first saves time and frustration.
Action Items
- Before your next editing session, try three different camera profiles on the same image before touching any sliders. Notice how the same RAW file can feel completely different just by changing this one foundational setting.
- Find a backlit image where the colors feel muddy or flat, then experiment with saturating the blue slider in the Calibration panel. Watch how the warm tones in your subject become more luminous – this is the “glow” technique in practice.
- Check your process version in Lightroom’s Camera Calibration panel and update any older images you’ve been struggling with. Sometimes the fix isn’t a new technique – it’s simply letting Lightroom use its latest rendering engine.
This “Summary” sheet is a very informative snapshot of the session. It sets the stage beautifully for the time being invested. Thank you for this enhancement to the sessions!
Awesome – glad you find it helpful!
I had to watch this video a couple of times. Currently on my second time around. I use to have this camera, I think it was either the Canon 7D or the canon 5D ? I dont remember… The colors were pretty accurate on this camera except I had a problem with purples. For example I took a picture of a field of flowers one day and all the flowers looked OK, that is the colors were accurate, except for the purple flowers which were rendered blue. No matter how hard I tried I could not get these flowers to look purple. Unfortunately I dont have those pictures, or those cameras anymore, or did I have Lightroom at that time, but if I did, I wonder if the Color Calibration tool in LRC would help in this situation ?,
To answer your question directly, yes, the Color Calibration tool in Lightroom Classic would absolutely help in that situation. It’s specifically designed to address these kinds of sensor-level color shifts by adjusting how the raw data from each color channel is interpreted. You’d likely find that moving the Blue Primary hue slider toward magenta, and possibly adjusting the Red Primary saturation, would bring those blue flowers back toward their actual purple color. The tool essentially lets you compensate for the sensor’s color bias, which is exactly what you need when the camera itself is misinterpreting certain colors.
Anyway, I hope that helps clarify things, and if you ever run into a similar situation again, that’s the first place I’d reach for in Lightroom.